What you'll learn - Find monthly sessions in list or calendar view. - Read session detail (summary, laps, rest). - Understand automatic lesson/free-swim classification, and fix it when needed. - Connect to labels, monthly reports, and share.
1. Where to open
Bottom tab History.
Tap the same tab again to toggle list ↔ calendar. List mode is the default the first time you open it.
If you want to skim a whole month at a glance, list is easier; if you want to check what you did on a specific date right on a calendar grid, calendar is easier. Both show the same data in different shapes, so switch back and forth freely. A one-time hint toast shows you the tab-retap shortcut the first time you use it.
2. Calendar mode
The top shows the month title plus Expand and Report buttons, and below it a month grid with a mark for each day you swam. Days tagged lesson and days tagged free swim are colored differently, so you can scan this month's pattern at a glance.
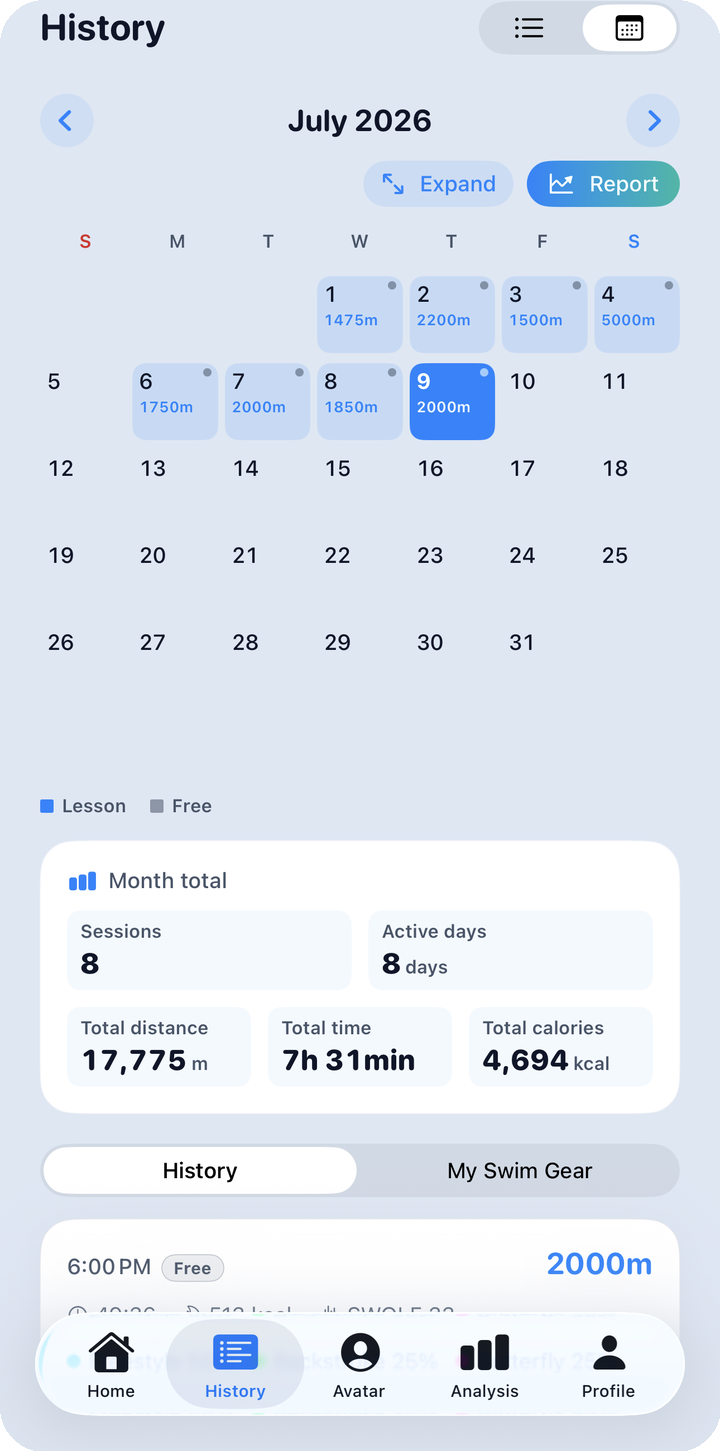
What to look at here: The cell color tells you whether that day was lesson or free swim, and days with no workout stay blank. Tap the top Expand button (or pinch on the calendar itself) to grow the cells and reveal more detail; tap Report to turn this month into a card.
The lesson/free color you see here is exactly the automatic classification described in section 4.4 below — if a color looks wrong, fixing the label on that session's detail screen updates the calendar instantly too.
Tap a date and a session preview card appears below.
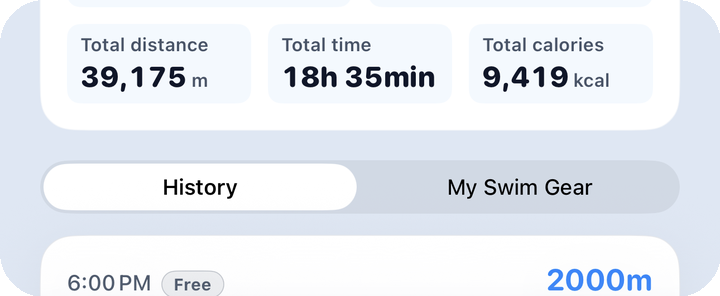
What to look at here: The preview card summarizes the key facts for that day's session. Tap the card to jump straight into session detail.
Expanding the calendar lays out the whole month as a bigger grid. If "Show swimwear section" is turned on in your profile settings, a mini outfit icon (cap, suit, goggles, etc.) for that day also appears — but only once the date cell is large enough. At the default (collapsed) zoom, outfit icons don't show at all.
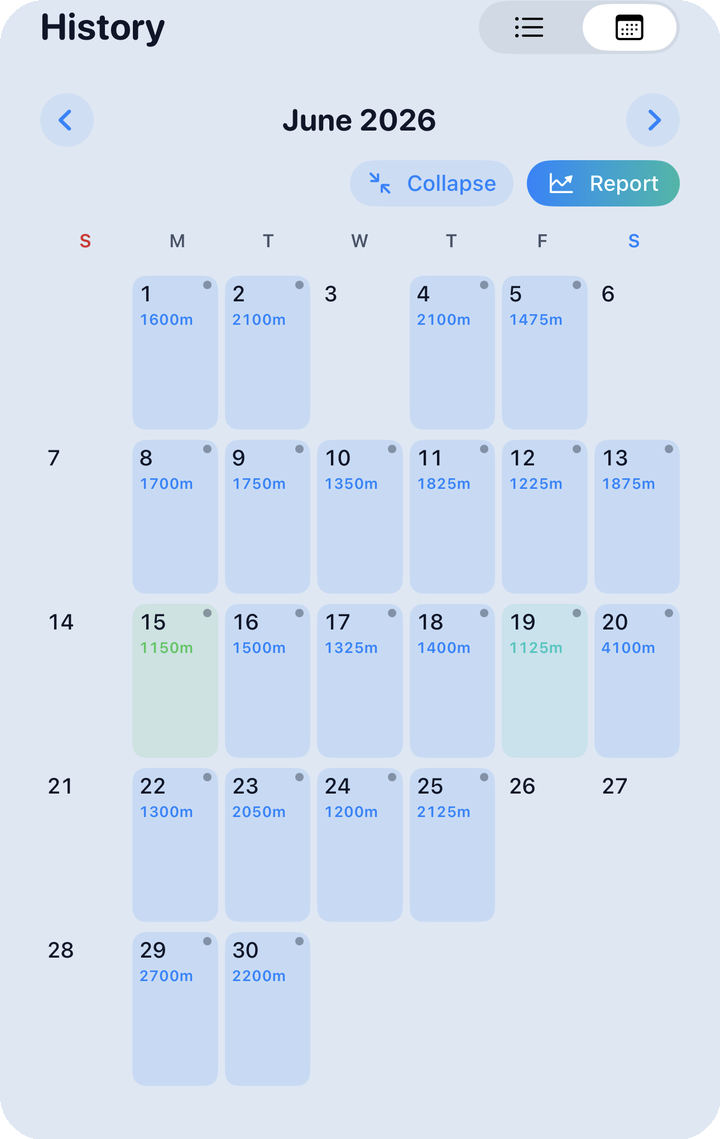
What to look at here: At the largest zoom, the cap/suit/goggles/other 4 slots show as a 2×2 mini grid; at a medium zoom only the suit slot shows. To fill in an outfit, gear up first in Gear closet.
3. List mode
Month arrows and a list of session rows. Each row is one session.
What to look at here: The colored bar on the left of a row shows that session's dominant stroke color. Next come the date (month.day + weekday), a lesson/free badge, total distance, duration (clock icon), calories (flame icon), SWOLF if available (wave icon — a lap efficiency score that adds lap time and stroke count; lower means you covered the same distance with less effort), pool name (when set), and label chips (up to 4 plus "+N").
- Tap a row to open session detail.
- Long-press for Share · Undo merge · Hide workout.
- Sessions logged on the same day are automatically merged into one row, marked with a "Merged · N" badge in the top-right corner. To split them back apart, long-press → Undo merge.
- If a stray session (say, a short accidental recording) is cluttering your list, long-press → Hide workout to keep it out of view.
4. Session detail
Tap a row or preview card to open it. Three tabs at the top: Summary / Laps / Rest.
4.1 Summary
From the top: a persona banner for the day, then the multi-chart. Persona is a badge summarizing your recent swim pattern into types like sprinter or endurance swimmer, and it refreshes with each session. The multi-chart stacks five channels over time — Style, HR, Pace, Strokes, and SWOLF — and you can drag to scrub through values at any point or pinch to zoom into a section.
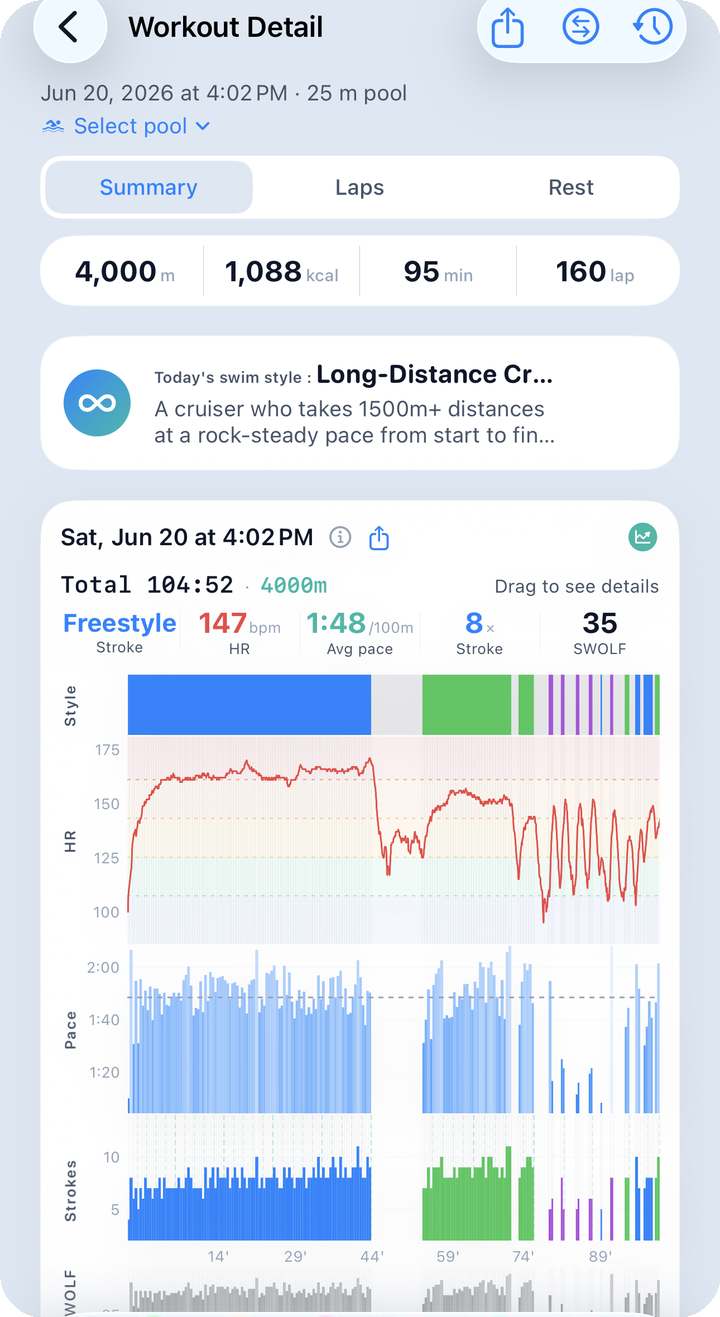
What to look at here: Use the top stats (distance, time, pace, etc.) to get the shape of the session at a glance, then drag the multi-chart to see exactly which lap your pace dropped on, or which zone your heart rate climbed into.
Scroll down for per-stroke pace, stroke count, and the SWOLF card.
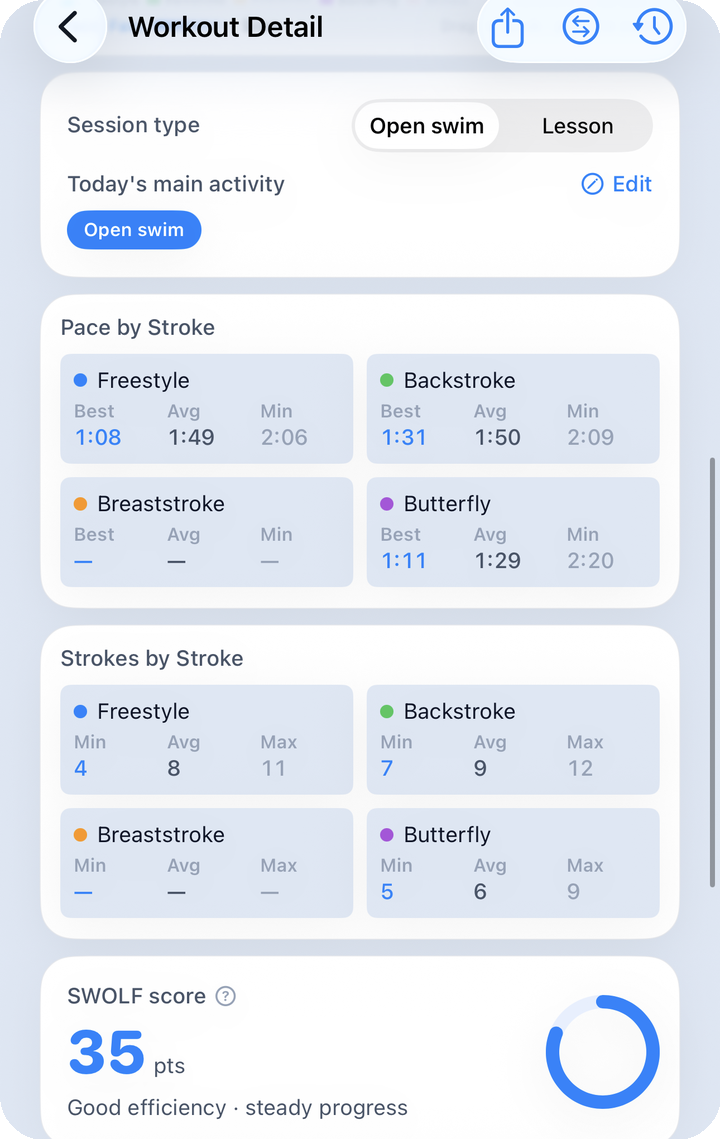
What to look at here: Pace is the time it takes to cover 100m. The per-stroke card compares best/average/worst pace and stroke count so you can tell which stroke felt easier, and the SWOLF card uses a donut ring plus a comment to tell you the efficiency level of this session right away.
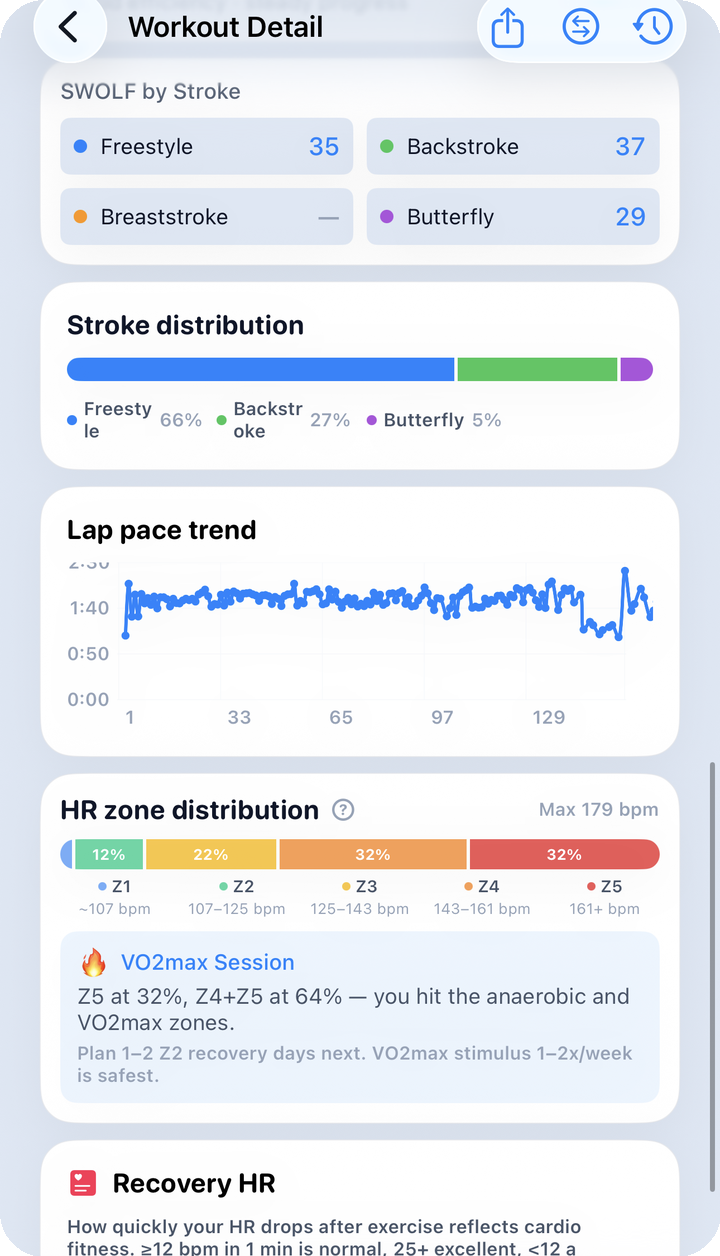
What to look at here: The lap pace trend chart (shown only with 3+ laps) shows whether you sped up or slowed down as the session went on. HR zones split intensity into five bands based on your max heart rate, and the zone bar shows how much time this session spent in each.
| Zone | % of max HR | Meaning |
|---|---|---|
| Z1 | 50–60% | Recovery / warm-up |
| Z2 | 60–70% | Aerobic base / fat burn |
| Z3 | 70–80% | Aerobic (endurance) |
| Z4 | 80–90% | Lactate threshold / tempo |
| Z5 | 90%+ | Maximum / anaerobic |
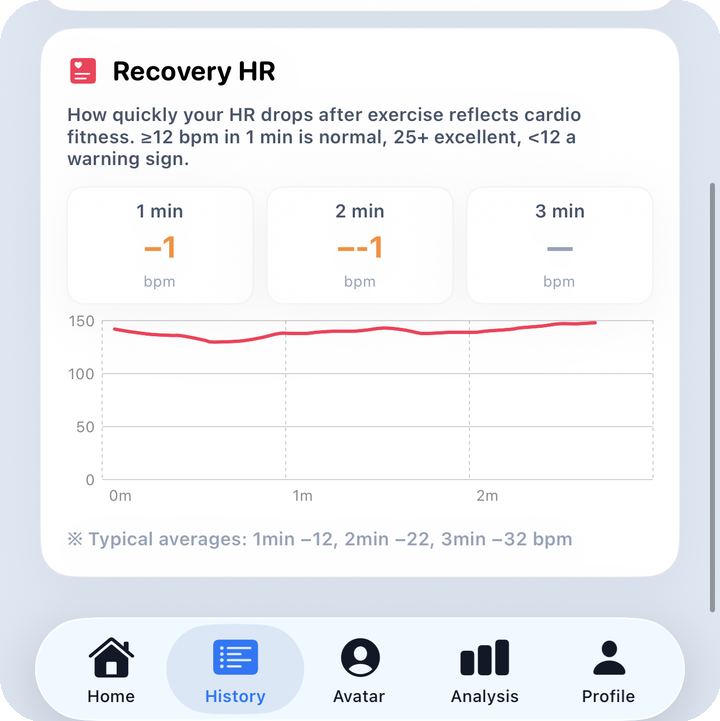
What to look at here: Recovery HR measures how fast your heart rate drops in the 3 minutes after you finish swimming. A drop of 12bpm or more by the 1-minute mark is normal, 25bpm or more is a very good recovery, and under 12bpm is worth checking in on how you're feeling that day.
The toolbar at the bottom of the Summary tab has Share (build a card or video), Compare (view alongside another session), and Edit workout time (clock icon). Edit workout time is covered in 4.6 below.
4.2 Laps
Per-lap time, pace, and heart rate as a row list. A summary card of this session's best/worst marks sits at the top.
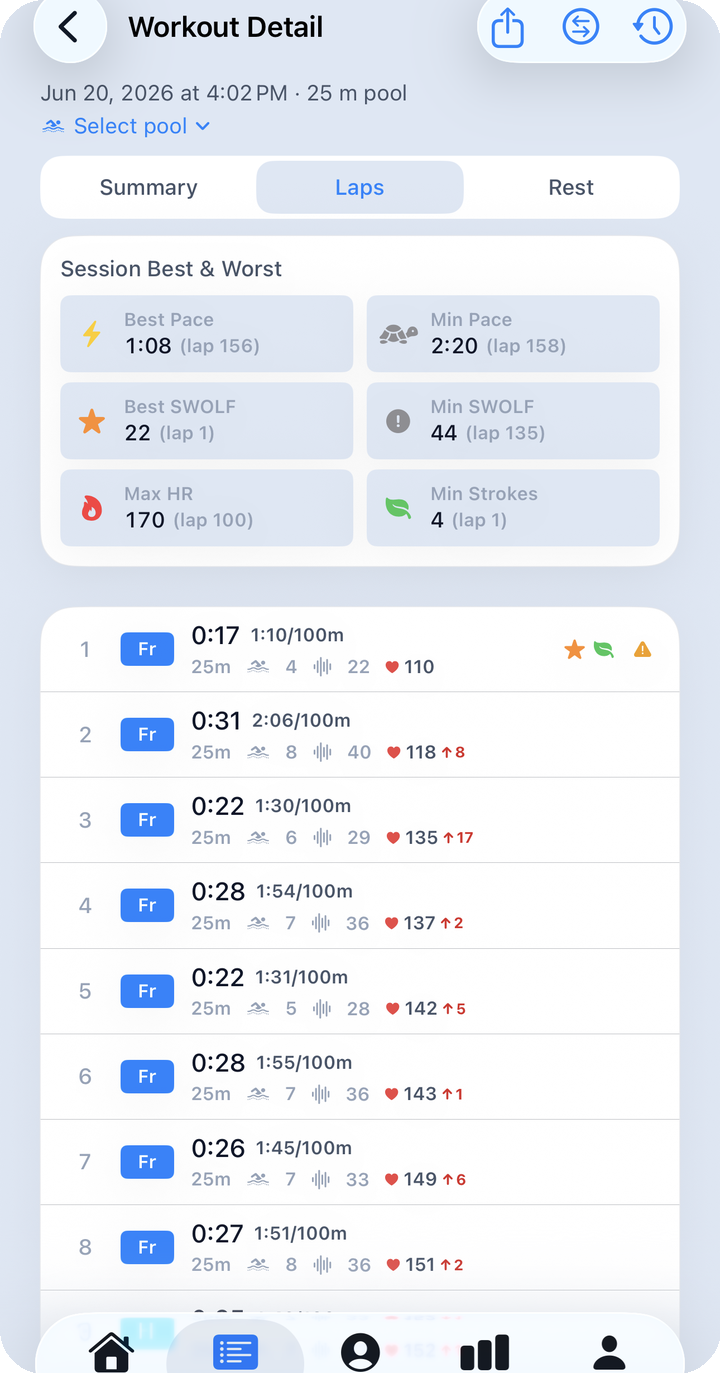
What to look at here: Each row shows lap number, a stroke color chip (2-letter abbreviation), duration, pace, distance, stroke count, SWOLF, and average HR (with an arrow showing the change from the previous lap). Notable laps within this session get an icon.
| Icon | Meaning |
|---|---|
| ⚡ | Fastest lap in this session |
| ⭐ | Best SWOLF lap in this session |
| 🔥 | Highest-HR lap in this session |
| 🍃 | Fewest-stroke lap in this session |
| Warning icon | An outlier lap that stands out from the rest |
A legend card explaining these icons appears only on the Laps tab.
4.3 Rest
Rest time between sets and the heart rate at that moment.
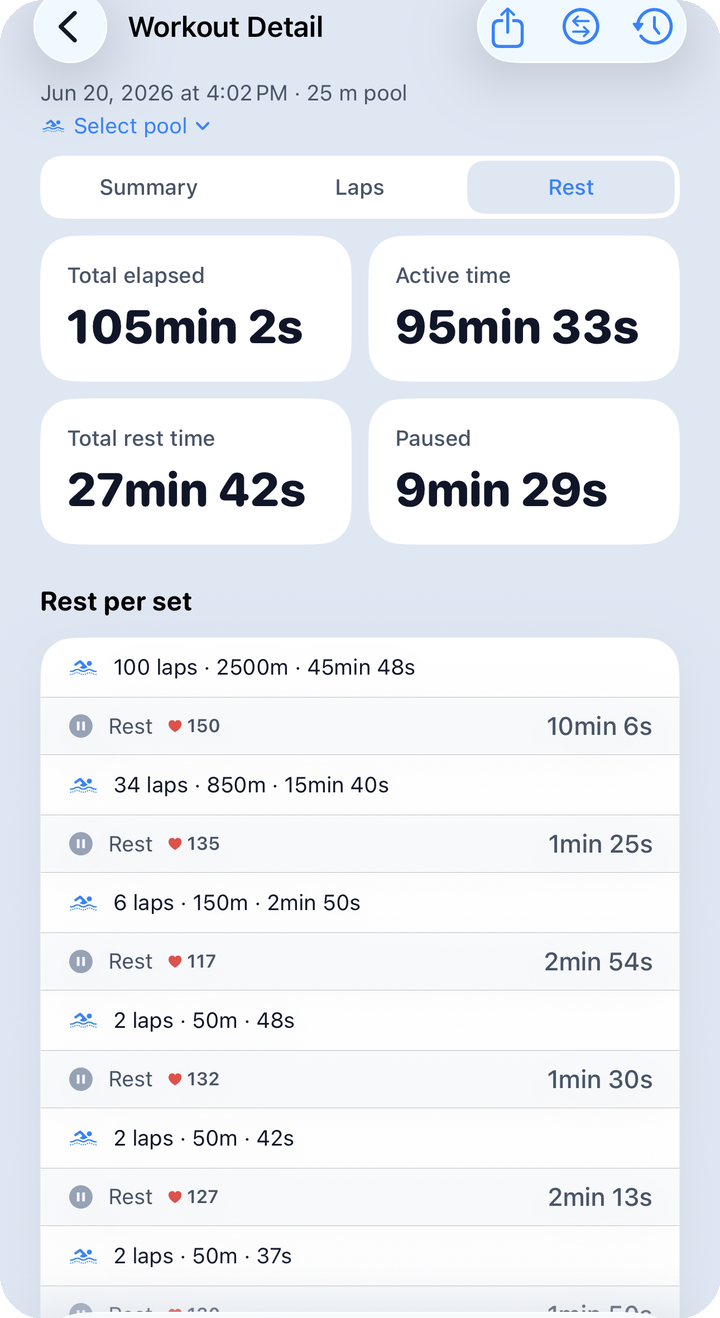
What to look at here: The 2×2 cards at the top each track a different clock — total elapsed time (start to finish), pure swim time, total rest between sets, and paused time (while the watch itself was paused). Below, a timeline alternates swim and rest blocks so an unusually long rest between sets stands out right away.
4.4 Automatic lesson / free-swim classification
Whether a session is tagged lesson or free swim is decided automatically. The app compares the lesson schedule you registered in your profile (day of week, start time, duration) against the time the session actually started; if it falls within the schedule's window (±20 minutes of slack), it's tagged "Lesson," otherwise "Free." This reclassification reruns every time you open the app, but it never touches a session you've changed by hand.
For example, if your lesson started 15 minutes late and got auto-tagged "Free" by mistake, you can fix it with one tap on the free-swim/lesson toggle in the "Type & label" block on the Summary tab. Once you change a session manually, it's excluded from future automatic reclassification, so the app won't flip it back.
If you haven't registered a lesson schedule yet, no session has anything to match against, so everything defaults to free swim. If you attend a weekly lesson, registering the schedule in your profile makes future auto-classification more accurate.
4.5 Detailed labels
The "Add/edit label" button in the same "Type & label" block opens the label sheet.
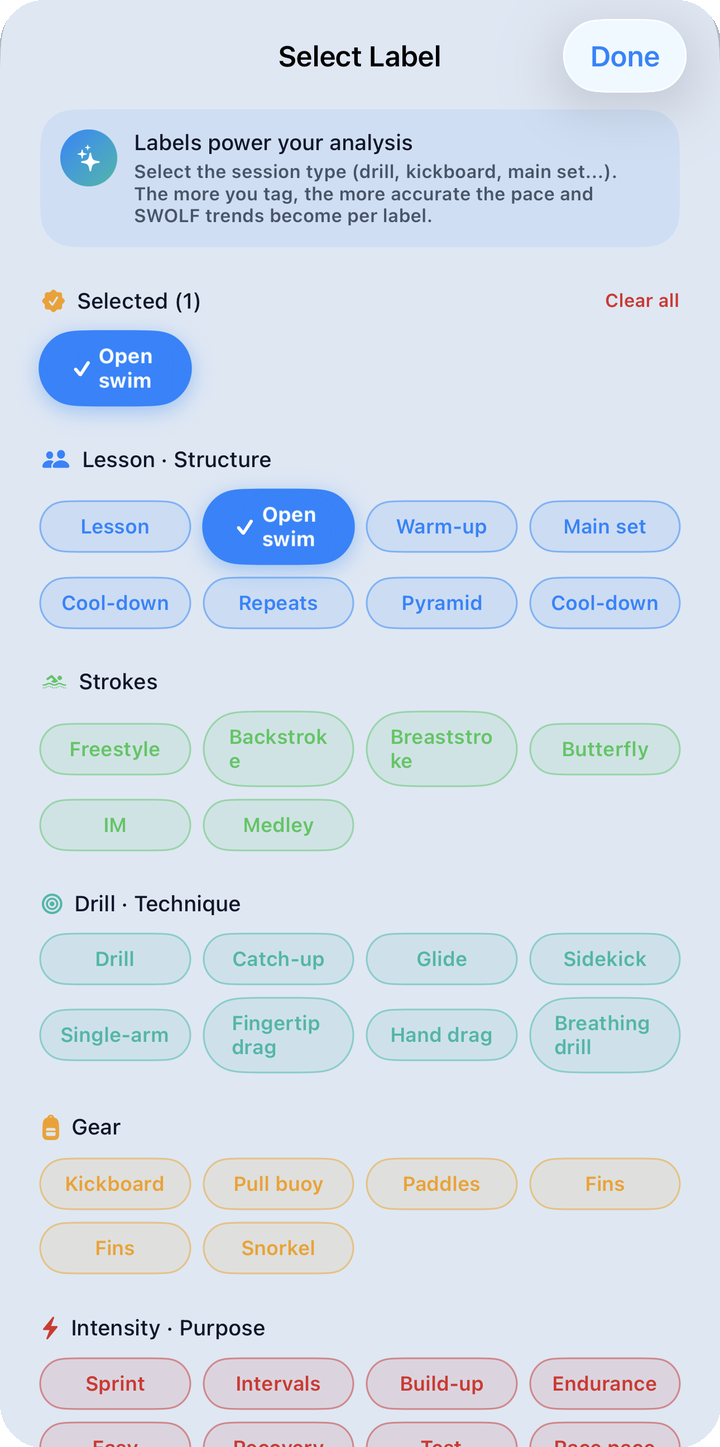
What to look at here: Tap chips from six categories to build up a set of tags.
| Category | Example chips |
|---|---|
| Lesson & structure | Lesson / Free swim / Warm-up / Main set / Cool-down / Repeat / Pyramid / Cooldown |
| Stroke | Freestyle / Backstroke / Breaststroke / Butterfly / IM / Medley |
| Drill & technique | Drill / Catch-up / Glide / Side kick / One-arm / Finning / Hand drag / Breathing drill |
| Equipment | Kickboard / Pull buoy / Paddles / Fins / Monofin / Snorkel |
| Intensity & purpose | Sprint / Interval / Build / Endurance / Easy / Recovery / Test / Race pace |
| Session type | Solo / Group / Race prep / LSD (long) / Form video |
Chips can be multi-selected, and "Clear all" resets them at once. If you did interval work, tag "Interval" under intensity & purpose; if it was drill practice, tag "Catch-up" under drill & technique — do this consistently and the label analysis in the Analysis tab makes it easy to look back at what kind of training you've been doing. Labels can only be edited from session detail; the label chips shown in the History list are read-only.
4.6 Fixing workout time
Sometimes the recorded workout time runs longer than the actual swim. For example, if the watch keeps recording while you shower and walk to the locker room after swimming, that time gets folded into "workout time" and throws off your pace and calorie numbers.
When the app detects your heart rate dropped to resting level for 5 minutes or more at the tail end of a session, it surfaces an "Auto-estimate workout time" card at the top of the Summary tab. Interval rest between sets is usually only 1–3 minutes, so this suggestion never fires for a normal rest — no risk of it mistaking a rest interval for the end of your swim. You can choose Apply (trim as suggested), Keep as is, or Edit manually. Manual editing lets you drag start/end sliders in 30-second steps with a live preview of the resulting duration. If the workout is too short (under 1 minute), editing is disabled.
This editor is always reachable from the clock icon in the Summary tab toolbar, even if the suggestion card never appeared.
5. Monthly report
In list mode the Report button sits below the month header; in calendar mode it sits next to the month header. Either one always opens that month's report card. It isn't a saved card — it's recalculated on the spot every time you open it, so switching months refreshes the data instantly.
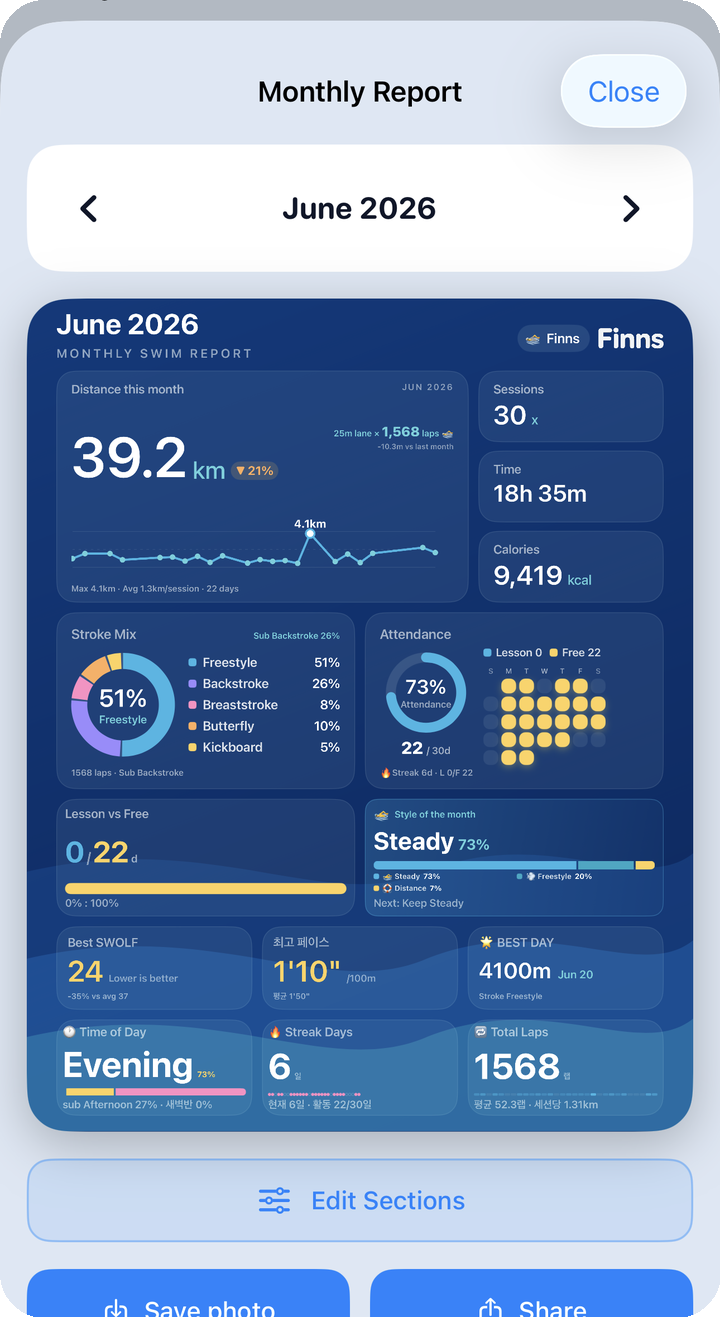
What to look at here: The card combines several sections — this month's total distance and trend, stroke mix, lesson-vs-free-swim split, this month's persona, SWOLF/PB records, and more. You can edit which sections appear and at what size, then save the finished card to Photos or send it straight out through the share sheet. For card layout and section editing, see Share.
6. Worth remembering the first time
- If a session keeps showing up as "Free" when it should be "Lesson," check your registered lesson schedule first; in a pinch, just fix that one session by hand — it won't flip back automatically after that.
- Lower pace and lower SWOLF are good signs; recovery HR is a good sign when it drops a lot within the first minute.
- If shower or walking time got mixed into your workout time, trim it any time from the clock icon on the Summary tab.
- Tagging labels consistently makes it easy to look back later at what kind of training you've been doing, in the Analysis tab.